Saturday, October 29, 2016

Laurel Burch Line Pattern Cats


Mrs. Vasco, a Title I teacher in our building, is a stylish lady! She often wears earrings that catch my attention. Sometimes they're cats, sometimes they're horses or dragonflies, sometimes they're flowers, but her earrings are almost always the work of popular 80's designer Laurel Burch. Her work reminds me a lot of Gustav Klimt- lots of patterns, gold accents, bright and colorful. Google it!


Kids love looking at Mrs. Vasco's earrings as much as I do and it may be because they love animals so much. What a great basis for an art project! I was inspired!


We looked at several paintings by Laurel Burch. We talked about the patterns we saw, focusing on tiny details. Some cats had tiny dotted line patterns around their eyes, others had zig-zag patterns. Some cats had flowers on their cheeks! We talked about what lines and shapes we could use to make patterns of our own. After drawing our Laurel Burch cats, students went to work adding fancy line patterns of their own. 


Many kind folks donate things to the art room that they think we might be able to use. Mini Pringles cans make great containers for oil pastels! 


Students shared oil pastels with their elbow partners (the person sitting next to them). They worked to carefully trace around shapes and lines, knowing this would become a waxy barrier for our watercolor paints later. 


Laurel Burch often used bright colors, so we avoided using brown and black when tracing our line and shape patterns. 


Check out those details! That bright color! 


After washing our hands from those greasy oil pastels, we painted over our patterns with watercolors! It creates a resist so the paint doesn't cover or stick to the patterns we drew. 


To add a little more Laurel Burch flare I introduced the kids to acrylic paint. It's one of those super cool art supplies that can destroy clothes by leaving permanent stains. We wear art shirts to protect ourselves, but it's best to save your favorite outfits for non-art days. Seriously, don't wear things you love to art class. We make messes while we're making art. Sometimes the messes are big. And permanent. Like acrylic paint. This paint was GOLD. It shimmered and shined, and the kids LOVED IT! We carefully traced details we wanted folks to notice. We added dots and lines to our designs. 


When students were finished we put them on drying racks to dry! The next morning my art helpers cut them out (they were pretty large and difficult to hold for cutting). Then they were ready for the walls!


Each cat has a personality all it's own! The kids did a fabulous job embellishing their Laurel Burch cats with patterns, colors, and GOLD! They've really fancied up the arts hallway. Kids of all ages love to stop to look at them, and the adults do too!


Wednesday, October 26, 2016

Dia De Los Muertos Sugar Skulls


Fall is my absolute favorite time of year! The leaves, the soups, the chill in the air! It's my favorite time of year for many reasons, and one of those reasons is teaching students about the Latin American holiday Day of the Dead. It's so colorful and positive! We learn a bit about it as an introduction to learning about Frida Kahlo, the first female Mexican artist to have a gallery show of her very own. She's a big deal in art history. She's such a big deal she's hanging as a mobile above table number 5 in the art room. To understand her art better, we talk about her culture and her life. Different cultures celebrate different holidays, have different traditions, eat different foods, dress differently, and that's ok. The world would be pretty boring if everyone was exactly the same. 


After watching a short video about Day of the Dead and looking at decorations for the holiday, we took a closer look at sugar skulls. They're elaborately decorated candy skulls used to decorate graves and homes for the holiday. They also help students learn some basics about drawing a face. We viewed several whimsical ways of drawing a skull. Did you know that when you draw a face the eyes shouldn't be at the top of the head? It's true! Your eyes are actually in the middle of your head. When I tell students this they look at their around the room to see if I'm right. Wow! I drew an example on the board of what it looks like to draw them at the top of the head and they agreed it looked really weird. Did you also know that the bottom of your nose is in the middle of where your eyes and chin are? Yep, that's true too. And your mouth is in the middle of where the bottom of your nose and your chin are. Go check! These are pretty close approximate rules that artists follow to draw a face, and we applied these rules to our sugar skulls (it'll help us with our next project!). 


Even when given the same directions, the same examples to reference, and the same supplies students amaze me with their differences. They make so many personal choices in their work that distinguishes them from others. It's excited to watch it all unfold!


Once drawings were embellished and fancy, it was time for black glue outlines! This was a first for me, and it didn't go as smoothly as I thought it would. Live and learn, right? I mixed my own black glue by adding black paint to regular Elmer's glue. So far so good. Then I refilled glue bottles from last year. A little messy, but it worked! A good way to reuse the bottles, right? I thought so too. Time for the caps! This might've been my mistake. The tips clogged often, making outlining difficult. These were the original tips, and even though I'd checked each of them to make sure they worked before using them for bottles of black glue they failed me. Miserably. The kids were troopers, we limped through that part, and next time I'll order new tips for the old bottles. Hopefully that will solve the problem! 


We added multicolored glitter to our black glue while it was wet for a sugary look! You're either a glitter person or you're not. I AM! After our blobby black glue dried it was time to add some bright and cheerful colors! We used watercolors. Day of the Dead is celebrated November 1st and 2nd. Bright and cheerful colors are used in happy remembrance of loved ones who have passed on. Our only color rules were no black and no brown. Keep it happy!


Students filled in the shapes they created, some choosing to add salt to their watercolor paint for a neat-o effect. Then we cut them out, ready to hang in the hall!


I've done several variations of this project over the years, always much smaller in scale than this year. This year they're huge! This was the first black glue year. This was the first cut out and stand alone version. I've seen others do this project in a million different beautiful ways. This year I used all of my favorite things about how I've approached it in the past, what I've seen that's different, and new things I wanted to try and mish-mashed it together into this! Look at all of those smiles! What a happy wall!


They're BIG, they're bright, they're whimsical (one of my favorite words), and they're CHEERFUL! 


I love watching kids on their way from lunch to recess stopping to look at the artwork on the walls, showing their friends which ones they like best or looking for their own work. Who could blame them for stopping?! The arts hallway is lookin' mighty awesome these days! 

Sunday, October 23, 2016

Contour Shoes


Zig-zag, curvy, vertical, diagonal, thick, thin, parallel, outline, contour- there are SO MANY types of LINES! The more you know about them and the better you are at drawing them, the more interesting your pictures can be. It's easier to communicate your ideas. It's like having a lot of words in your vocabulary. The more words you know, the better you can communicate your thoughts and feelings. 5th graders have been learning about outlines, contour lines, continuous lines and blind contour lines. That's A LOT to know about lines!


So let's take a closer look at lines. After comparing and contrasting the various types of lines (outline vs contour, continous vs blind contour), we practiced continuous blind contour drawing. That's a mouthful. It's just as tricky as it sounds, and there was a lot of giggling! Blind drawings are done without looking at your paper, so they're really wobbly and strange looking. The purpose is to train your eye to measure spaces and to be synced with your hand as you draw. We talked about tracing your hand and all the little details with your eyes and moving your pencil as if they were synced. In my first demo attempt, the drawing of my hand was much too wide, but the length of my fingers and the spacing between where my fingers bend was pretty good! We critiqued my drawing together and students gave me advice on what I needed to improve, so I tried it again with a bit more success, talking to them about my thoughts during the process so they'd know better how to approach the challenge when it was there turn. It's good for the students to see that I struggle too. This isn't easy! To ensure that no one was cheating, we folded a piece of copy paper into 4 boxes. Next, we poked our pencils through the middle ("X" marks the spot!) and used it as a "tent" over our drawing hand. Then, students held their other hand out in front of them and attempted to draw it. They couldn't wait to show each other! At first glance everyone giggled. Then we looked a bit closer to see if we did anything well. Most measured the distance between knuckles well. Our biggest struggle was that our hands were drawn much to wide. We practiced, trying to improve that. Everyone had fun!


Next we played a line game! I compiled a variety of line drawings in a PowerPoint and kids identified the types of line drawings they saw. They sure do know their lines! We also looked at shoe illustrations by famous Pennsylvania artist Andy Warhol. What kind of lines were used? Did he include all of the details? Why were we talking so much about shoes?! We're going to draw our own! Smelly, yes. Sometimes very much so. But everyone likes airing out their toes. 


To get started students traced a template of a size 13 foot. Everyone's shoes would be the same size, it forced them to draw big, it helped them measure with their eyes where parts of the shoes should be in their drawings. Students drew their shoes around the foot they traced, and tried really hard to draw LIGHTLY AT FIRST! It's much easier to erase later. Sometimes we erase a lot


When students finished their pencil drawings they traced over their lines with an ultra-fine sharpie. Trace and erase!


The kids really wanted to add color, but we didn't want to take away from the line drawings of their shoes. They were SO GOOD! So we explored various ways of adding color to the background instead! Some students used colored pencils while others used markers or watercolor. I showed students that you can use water over marker and sprinkle it with salt for a fun tie-dye color burst look. They chose how to fill the background. They love choosing, and they're pretty good choosers. 


Every drawing is different. Every background is different. And they look AWESOME!


I can't wait to get these on the walls this week in time for conferences! Parents will be walking around with their jaws on the floor! That's how good these are...

Contour Line Calder

6th grade is a pretty big deal. It's their last year in the elementary school (sniff, this was my first group of kindergartners!). They're the oldest kids in the school. They've learned a lot. The rest of the school kids look up to them. It's a lot of responsibility. There's more responsibility in the art room too, but in a fun kind of way. We use tools and materials we've never used before to make cool new things, like wire portraits!


Wire is a bendable, dimensional line. Before we could bend wire lines into masterpieces, we needed to understand the different types and be able to apply them to drawings. We compared and contrasted examples of contour lines (the outline and other basic visible edges; i.e. tracing your hand and adding the wrinkle lines from your palm), continuous contour lines (you can't pick up your pencil while you draw, which means you do a lot of connecting parts and retracing lines you've made), and blind contour lines (you can't look at your paper at all!). And then things got a little silly...ok,  maybe a lot silly, but it was fun!


One brave volunteer agreed to come up to my stage so that I could draw her as my demo of blind contour drawing. Why do this? Why not just look at your paper? It's a great way to train your eye and your hand to work together. As you trace things with your eyes and measure how far apart and close together parts are, you attempt drawing it at the same time. It takes practice. It's not an easy thing to do, even for the art teacher who's done this before, and it's important for students to see that sometimes my best looks pretty wobbly too. Ella was a good, no wait, better than good...she was a great sport! I warned her that my drawing of her would be wiggly and strange. It might even look like her face was melting a bit, or like I was trying to draw like Picasso! She smiled and agreed to proceed! As I drew, the rest of the class watched and giggled a bit. They weren't giggling at her, but at my drawing, and not in a disrespectful way, but in a this-is-crazy-is-she-going-to-make-us-do-this kind of way. While I drew I talked to them about what I was thinking, what I was looking at, and what I was trying to do so they'd know how to approach it when it was their turn to give it a try. We critiqued it together and talked about what I did well (for not looking it really wasn't that bad!) and what needed to improve. Then it was their turn!


Students made little paper "tents" to slip over their pencils by folding a piece of copy paper twice and poking the pencil through the middle. This prevented those who were tempted to sneak a peek at their drawing from doing just that! Aren't you supposed to look at your paper?! Most of the time I'd say yes, but we were practicing blind contour drawings. This activity trains your eyes and hands to draw together to improve your skills! No peeking! 


Students looked in double sided mirrors to do a blind contour self-portrait. The first drawings were a bit rushed because we couldn't wait to see how we did and how weird the drawings were. There was giggling, sharing, look at this! Then it was back to the drawing board to try it again. Rarely do first attempts look amazing, and that's ok. 


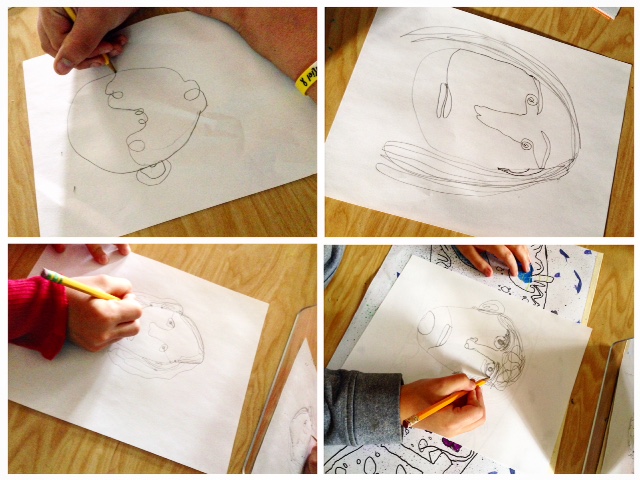
The next time we met we viewed and discussed the wire sculptures of Alexander Calder, inventor of the mobile. That's right! They're not just for hanging over baby cribs, they were first created as pieces of art! Calder was a Pennsylvania artist who began creating things as a young child. His parents were artists that supported his creativity. We looked at his wire portraits and compared them to photographs of the people they represented. How did he make the eyes? How were the eyes and nose connected? What loops were used to make the nose? Were all of the mouths the same? No, so how were they different? We were looking for ideas that we could apply to our own work. With several examples to reference, we got started. The pencil tents were put away. Students were able to draw continuous line drawings of themselves with a mirror and projected examples aid them. No one approached it exactly the same way. Different eyes, mouths, noses, hair. 


When the drawings were complete, students needed to learn wire and tool safety! I buy spools of fencing wire from Tractor Supply for wire projects. It's easy to store, easy to bend, and one spool can meet my needs for the year! Several students knew exactly what it was when I demoed because they have farming experience. I loved that it showed them that they could do something new with something familiar. Art is pretty awesome like that. 


Students learned how to cut it from the spool without letting it all unwind into a mess. They learned various ways to manipulate the wire with needle-nosed pliers, how to take care of end bits of wire that poked out, how to anchor your wire so your face didn't move, how to attach a new piece so they could keep sculpting. 


Students that finished helped those who struggled with cutting the wire. Everyone was responsible with the tools. Everyone cleaned up well. 


Sometimes in art your original idea doesn't work out as planned. Most students experienced this while working on their wire portraits. The eyes they bent might be different than the eyes they drew, the mouth was totally different because they ran out of wire, they discovered a better way to make eyebrows than their reference sketch idea, a friend suggested tweaking the hair and they liked that idea better. It happens. I change my mind in the middle of my work often. We were problem solving in the thick of it and they did a great job! Creative Problem solving is a big part of making things. It's a constant in the art room.


When students were finished with their portraits I gave them a paper to critique and grade themselves with. I wanted to see how they thought they did and I wanted them to justify their thoughts. It helps me understand their thoughts, and it helps them to really pause and think about their work.


Some were surprisingly much harder on themselves than I expected. I visited each table while they worked to add my comments to their paper. Giving positive feedback is important. It feels good to know someone sees good in your work. Everybody needs that from time to time. 


And when students were finished with their critiques, I collected the wire portraits! 


I took advantage of an early dismissal day to hang them in the hall with a glittery new sign and can't wait for students to see them tomorrow! They look SO GOOD!!!


Teachers passing through that saw me hanging them commented on what a great job the students did. They paused to critique a few. They asked questions about the project. The kids should be so PROUD of how well they did, because I most certainly am!

Saturday, October 15, 2016

Kindergarten Land Art

Lines are super important in art. We need to be able to draw them, turn them into cool stuff like monster teeth, wavy hair, rolling hills and mountains in our drawings, and make patterns with them. We've practiced lines so much that we're totally line experts! So when students came to art this week I had 2 "rainbow" lines on the floor made with construction paper to talk about. Kinda weird, I know, but there's a lot more going on here to think about than meets the eye. How many lines do you see? Most of the kids said 2, which makes sense because that's how many I made with paper. Just a few raised their hands because they saw 3. 3 lines?! Where are they getting 3 from?! Well, the space between the lines creates a 3rd line. It was a pretty cool thing to notice! They told me what type the lines were (zig-zag). They noticed that the colors changed in the same order as the giant colorful crayons I have hanging from the ceiling. This was all really good thoughtful stuff. This brainstorming together was getting us ready to learn about an artist who used things in nature to do very similar things. It would help us talk about his art. 


We looked at a black and white picture of Andy Goldsworthy and talked about his hat (I'd post a pic but copyright is an issue, so google him and you'll know what I mean!). Where would you wear a hat like that? Texas! A cowboy wears a hat like that! An explorer guy! We decided together that he must really like being outside. It definitely a workin' outside kinda hat. Andy Goldsworthy is a famous British artist known for his land art. Land art is made with materials found in nature, like soil, rocks, sticks, logs, and other organic materials (leaves, plants), and water elements (ice, snow, water). Some fade away quickly, while others last many years. Then we started looking at his art. We focused on examples of his work that featured lines we know. We thought about is work, asked questions, talked about it. I asked the classes what his art was made of. Leaves! Sticks! Sand! Ice! Rocks! Why do you think he took a picture of it? So he could show people! Will this last forever? No! And they were right about all of those things. Why wouldn't it last forever? The wind could blow the leaves away! It might rain on the leaves and they'll get mushy! They'll turn brown and crunchy! People walking in the woods might step on them because they didn't know it was there! These were all good thoughts. Any of them could happen. We talked about what he made and how he made it. 


We decided to practice making lines we knew in our classroom with art supplies we had inside. Students worked with the people at their table as a team to make one of the lines we know. We tried to keep in mind little things we learned about Andy Goldsworthy and his art while we worked. Each table was given something different to work with. Even tables that chose the same line approached them very differently. The marker cap table connected the caps so they wouldn't roll away while they worked. Problem solving


The q-tip table chose to do 3 q-tip lines, explaining that the spaces between them were also lines. They worked really well together, wrapping their straight line around the edge of their table. 


The pompom table said their line was a dotted line, using each little puff as a dot. They started out straight but ended up making it into a large curvy line that wiggled around their table. They had pompoms of various colors and sizes to work with. Some students preferred the tiny pompoms because they were so cute, while others liked the bigger fluffier ones.


The colored pencil table created a large zig-zag line that zig-zagged around their table. Items that didn't belong in their colored pencil bin and weren't useful in their line making were banished to the middle of the table and out of their way. 


The clip table had fun sorting through the various sizes and types of clips in their bin. They made several straight lines on their table using the types of clips to change the sizes of their lines. 


The last fun step is to get outside like Andy Goldsworthy! Students can use things they find on the ground (we don't want to harm living plants) to work with their team to create a line. Groups decide before going outside which line they'd like to make. We talk about what our materials can be, and they begin gathering them as soon as we step outside. 


In addition to materials and type of line, students must choose a location for their artwork. 


We visit the various lines created by the groups and discuss them. We talk about what type of line is created, how many lines we see, what materials were used, where they chose to make the line, and any other special things we notice about the final work. Did they change the thickness of the line? Did they use a color gradient like Goldsworthy often did? Then we photograph it like Andy Goldsworthy because it won't last forever! Line adventures are fun for all and can be enjoyed at home too! Try making shapes you know and faces with things you find in nature, and be sure to take a camera along to capture it!